History of my F-16 simulator
Well, what prompts you to do it? To construct an approximately 300 kg monster
made of wood, aluminium, acrylic glass, and many meters of wire and to place it
in your study - a monster where many people, when seeing it for the first time
can't stop being amazed?
| As it all begun |
 |
As a dedicated pilot I always have been interested in flight-simulators for the
PC. In fact I must confess that at this time I never differentiated between
civilian and military flight-simulators. On the contrary: military flight-simulators
always fascinated me more. They are much more complex and require substantially more
training and concentration when flying - as long as they are somewhat realistically
reconstructed. One of the simulators which captivated me very much at that time
was the
"Falcon 2" of
Microprose. Nevertheless, playing wasn't really fun. The programmers
had done everything to make the simulator as realistic as possible, but we commoners
were sitting at the keyboard, with the right hand on the joystick (or what passed
for one at that time), teh monitor in front, the cup of coffee and the documentation
on the left. Then we got into it: Full throttle (press "+" on the keyboard) .....
[many keystrokes later] ....... there's an enemy aircraft coming from the left
- I'm doomed, the Joystick slips away ...... which key do I have to press to look
to the left? ......
[many keystrokes later] ....... radar combination, "CTRL"
or "ALT"!?!?! with "R" together .......
[many keystrokes later] ....... press
"Enter" to try again after your funeral (after crashing because of a too slow
reaction or rather: because of too many multiple-moves). Do you know that? Aren't
you familiar with that?
I believe if all real military aircraft would have to be flown this way with a
Joystick and a keyboard (naturally without an autopilot) nobody would dare any
more to wage a war ... Well - back to my "personal" history.
To fly this was terribly nerve-cracking. I began to think about making the environment
of the game more realistic. Once the first throttle controller from Thrustmaster
became available, flying was almost perfect - that was what I at least believed
then. Unfortunately, though, I now had two controls which danced the Lambada on
my desk when my body was violently jerking and moving. You really should once
observe the enthusiastic freak of flight-simulators from behind while flying on
the PC: That's physical extasy in its purest form; Why fitness-studio? - how many
calories you are burning there ... isn't that a good topic for a doctoral thesis?
So I built my first chair the simulator. Quite simply, it was a rectangular board
with foam rubber padding on the seat face, on the sides screwed on two boards
as if they were little wings. On the left board was the throttle firmly mounted
with vertical adjustable locking lever, and on the right board the Joystick. To
use it I placed the whole unit onto a normal chair, sat on it, and I could take
off. Nothing was wobbling any more, the throttle controller stayed where it belonged
even after grabbing for the keyboard. And so the real "F-16-feeling" arose while
the chair was occasionally tilted to the rear by 30 degrees on two legs. This
part I however wouldn't necessarily recommend since the resulting force of gravity
can at times become painfully apparent ...
| The idea |
|
For a while this worked pretty well. But the problems with the '§$?&%!#-keyboard
remained. Frequently I felt the desire to have four hands just for the operation.
Slowly, therefore, a plan crept into my mind to built the cockpit of the F-16
on a 1:1 scale. You may now think: "What a crazy idea!" Initially I thought the
same. But the more I thought about it, the more grew my desire.
But how are you going to construct something where you not even have the faintest
idea what it looks like? I procured all books and booklets about the F-16 that
I could get hold of in Germany at that time. That wasn't too much! Mostly only
colourful pictures of the F-16 on the ground or in the air, but never a good picture
of the cockpit. After heavy research I got hold of the booklet
"LOCK ON No
2 - General Dynamics F-16 FIGHTING FALCON" of the publisher "Verlinden Publications"
(ISBN 90 70932 03 2). Here I have to remark that those American or English specialist
books are shamelessly expensive in Germany - one believes the $-exchange rate
were 1:5. Happy are those who have a friend in the States or in England. Well
- I didn't, and the internet was only known from the hearsay. So I had to fork
out a lot of money to buy the booklet. For me it was the first publication which
showed many parts of the F-16 in close-up, of course the cockpit as well. The
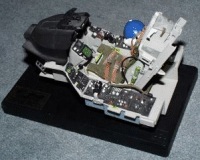
booklet also showed a model of the cockpit in a 1:12 scale
(cf. picture besides).
Unfortunately, though, the shown parts were of the F-16 block "A" but I wanted
to build the cockpit of the newer version "C" at all costs, which is considerably
different to the "A"-version. But I felt that at least the proportions of the
"C"-version shouldn't be too different to the "A"-version, so I started to dig
out all my knowledge of trigonometry and optics to achieve at least a rough idea
on the length/width/height dimensions based on these photos. It was pretty difficult,
and as it turned out later, not always quite correct. But I was at least an inch
closer to the realisation of my dream.
On heaps of DIN-A3 and A-4 sheets (the environment may forgive me) I made the
first drafts, sketched, drew, rejected, dreamt, calculated, sketched ...
[many months later]
... for professional reasons I transferred to Berlin. Now this coincided with
better finances (Berlin privilege - yes, such things happened at that time). And
then two important things occurred, which set the footstep towards the dream of
my "own" cockpit in the right direction:
1. The first ILA 1992 in Berlin (International Aviation Fair)
2. The move-house of a good old friend and learnt cabinetmaker to Berlin
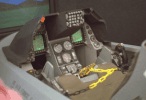
At the first ILA (unfortunately I could only visit it at its last day) I found
rather by pure coincidence in a hall at the edge of the fair a reproduction of
the cockpit of the F-16 in a scale 1:1!!! I couldn't believe it: Just this way
I had imagined "my" cockpit. This one surely was, correctly and professionally,
exactly the configuration of the F-16, with almost all instruments in it. I shot
all my remaining film, and took pictures from all sides and angles
(cf. simulator-photos). I was amazed that nobody arrested me on suspicion of espionage.
Based on those pictures and the above mentioned trigonometry I corrected and improved
my drafts.
Then Joe (the cabinetmaker) came to Berlin. At one of our meetings I mentioned
my dream of an own cockpit. I only intended to get some good advise from him -
the specialist - on material, etc. and how I could construct it. He contemplated
my idea quietly and then said he could help me if I wanted. To build such a cockpit
would be much more interesting than just manufacturing cabinets and shelves. I
only had to provide him with exact plans. He gave me a great deal of tips regarding
construction of the unit (statistics etc.) and the available kinds and thickness
of wood. Based on this information I revised my plans (very warm greetings to
Bianka who backed me doing so).
| The construction |
|
A few weeks later the plans were finished, Joe had bought the right material and
now all of us (Bianka, Joe and I) were standing in Joe's workshop at the weekends.
What happened next I unfortunately did not document any more by camera - maybe
I was still considering it to be only a dream. For three weekends we sawed, filed,
glued, sanded, drilled and varnished one faster than the other. In the evenings
we were looking like - well, I rather spare you with the description ... But I
had the feeling that I would have had at least 1 kg per "work"day of sawdust in
my nose. How do carpenters stand it?
Then it was finished! Still without electronics, switches etc., but it already
looked like the real thing.
A "trifle" problem was the transport of the simulator to my flat - it weighs,
fully assembled but without electronics - some 270 kg. Fortunately I paid attention
during the construction that one can divide the simulator for handling purposes
into "handy" peices. So also this hurdle was taken.
| The equipment |
|
After this launch I equipped it in my flat. First the Joystick, the throttle controller,
and the rudder control pedals were inserted. Unquestionable, the only useful stick
was the "F-16 FLCS" of
Thrustmaster,
which copies the stick of the genuine F-16 quite well. The throttle controller
was likewise of Thrustmaster. I later exchanged it against the "F-16 TQS" of the
same company. Also this stick is a good copy. For the rudder pedals I used the
"RCS" - also of Thrustmaster. With this one I am not very satisfied- contrary
to the two other parts. It reacts unpredictably even if only fine movements are
executed. It also does not have toe-breaks which makes rolling on ground very
difficult.
After all the controls were installed, the monitor was mounted and everything
connected to the PC (in those days still a 4/66 with 16 MB - insanity), the first
"test flights" could be dared. I wasn't disappointed - it was a superb "feeling".
Of course the keyboard was still only on a small wood between the legs (as the
small serving tables at Lufthansa), but that should change soon after.
Initially I spent a lot of time pondering how and with which instruments and control-panels
I should equip my simulator. Since I not only wanted to use it for military but
also for civilian simulations, the control-panels of civil planes should also
exist. I also didn't have any good pictures of details with all the switches and
legends of the real F-16 block "C". The above mentioned pictures of the F-16 simulator
made at the ILA unfortunately did not show any details. I therefore decided to
compromise: In the first version of equipment of my simulator I also built in
elements of civil planes (switches for flaps, rotary switches for COM, VOR´s and
ADF etc.).
Nowadays I am of the opinion: If I reproduce a cockpit in the scale 1:1, then
I do it as precise as possible. After the second and third ILA I also got sufficient
pictures of all instruments and panels of the F-16 Block 52 in order to exchange
all "wrong" panels with fairly precise reproductions. Later more ...
| The electronic |
|
Because I am not a learnt electrical engineer I wanted to simplify the work with the new controls (switches,
buttons, etc.) as much as possible. I bought a control-panel from
Aerosoft
which was equipped with the most important control-elements for the then
Microsoft FS5, and tried to exploit it for my purposes. I removed the case and un-
soldered all control-instruments I installed the left-over printed circuit-board as basic part in the
simulator. The wires to the individual switches and buttons were extended and mounted. But at the first test
the crunch came: The first five elements still worked perfectly, but after the sixth nothing worked any more.
After some telephone-calls with the technicians of Aerosoft - who were, by the way, always patient and
qualified - the problem was identified: One cannot extend wired endlessly - the circuits on the circuit-board
had been dimensioned for extremely short lengths of wires (max. 15 cm), and I tried to extend them to up to 2
meters. That couldn't work out. Consequently, I had to continue my eductaion in electrical engineering.
[many months later]
After much studying, questioning and some help from outside I then got a rough solution for die problems of
the switches. I bought a freely programmable keyboard-controller of IHSE GmbH (Article-No. GCK-210-FREEPR).
With this controller one can connect up to 128 switches even over larger distances. With a special software
each of these switches can "learn" a specific key-combination. So I had almost exactly what I needed.
Now only the problem with the rocker switches had to be solved. What problem is this again? If one presses a
key on a keyboard, an electric circuit is closed only for a brief period of time, until the key is again
released. Normally one presses a key only briefly, in order to achieve something in a flight simulator, e.g.
once the key "G" is pressed, the gear becomes - depending upon previous position - either retracted or
extended. A rocker switch however, is always in a switched-on or -off status. Thus, in the one position the
electric circuit is permanently interrupted, in the other one it is permanently closed. If one applies this
now to the example with the gear, either nothing at all occurs or the gear cycles out, cycles in, cycles out,
cycles..... , etc. While flying, this is not very funny.
At first I thought that this could be solved by a simple soldered-on relay, but reality proofed different. The
solution for this problem is in a small, built-in circuit board (one per rocker switch). If this is attached
to the rocker switch the electric circuit is short circuited with each change of position of the switch, just
as long as to simulate a short stroke of the key. The disadvantage of this solution is that the circuit board
is somewhat complex to manufacture, and one is necessary for each of the 100 switches, if all the rocker
switches are taken into consideration. As a comfort, however, I don't know at present any flight simulator
which has all rocker switches functioning as originally intended. Even the presently best available F-16
simulator
"Falcon 4.0" from
Microprose makes
provision for only a fraction of the rocker switches. At present about 30 of my switches are in use, thus I
can represent all the functions of
"Falcon 4.0".
Also building these circuits was kind of expensive and I was getting really stressed programming the controls
to have them working properly in my simulator. After a while I found a very elegant solution: the
EPIC card, which is more or less the Cadillac of the available electronic
for home cockpit-builders. I have to mention, that the documentation is not as good as the card, and sometimes
I just drives you crazy if you want to understand a certain function of the EPIC. With some help from some
friends, I finally could power ALL the switches of my simulator, as well as warning-lights and other lights.
After understanding the method, programming the EPIC to handle these components it is easy, but at the
beginning it might be complicated. Programming the EPIC allows for example to engage the auto-pilot using a
switch in the pit. The matching condition light will light up to show a/p in use. If you move the joystick a
certain amount, a/p will disengage, and accordingly the light will get off. Sound good, doesn't it?
| The instruments |
|
Beside the control units, a cockpit reproduction should naturally also contain all the instruments. I
considered this for a long time, for how one could copy them. Originals were out of the question for cost
reasons, quite apart from the fact that many instruments of the F-16 are not available at all. OK, it would
have to be reproductions. Functionality or mockup? A functional reproduction has surely its attractions, but
which software supports this already? I do not know any. Perhaps in a few years, but there are none in the PC
sector yet. Thus I chose the mockup. With a little acrylic-glass, thick printed card-board, a pair of scissors
and glue you quickly get a reproduction that looks deceptively similar to the genuine instrument at first
sight. In this way I developed all my instruments, and I think I can live with this.
| The redesign |
|
After some time, some things started to bather me about my simulator. At the beginning I did not think that I
was able to build exact replicas and therefore just built parts that matched more or less the original
concept. Another reason was, that at that time I didn't have all the correct dimensions of the panels and
cockpit. So in my "first version" the ICP turned out to be too big, as I did not know that the front console
gets narrow at the front. As I want everything as perfect as possible, all these errors were bothering me.
After getting all the required information I re-designed the front panel and Joachim helped me again to build
the second version. After finishing it, I was astonished to see how lousy the first version really was. Now it
looked really good.
After this I re-installed all the cables and connections of the EPIC again. I also replaced some panels, which
did not match and for the first time all the indicator and warning - lights were installed correctly.
| And today? |
|
Today my simulator is about 80% finished. This 80% is not to be taken literally. For years I have been
building the simulator and for years the simulator has been only 80% finished. I believe it will always be
"under construction" and will never be fully finished. On my "To Do list" at present the is still
following:
- Complete instruments on the right panel.
- Redesign from the seat.
- Revision of the head-up display.
- Lighting of the instruments and control units from below.
- Installation of correct MFD displays, to be controlled via an old PC.
- ......
| What is its result? |
|
Many may regard this as a toy of a game freaks, perhaps they are right. I however gained loads of experience
from it - apart from a large amount of fun and over 1,000 working hours. Since I do not only operate military
flight simulators on it but also very good civilian, I am convinced that I have saved a great deal of cash in
my practical flying training for development hours, and I will surely still continue saving. In a "more
realistic" environment one learns more easily, understands connections faster, and can concentrate better on
the proficiency of solving problems. Naturally the simulator will never replace proper flying, but it helps to
save cash. Why must I pay for training on, e.g., a Holding or a VOR Interception DM 400 per hour, where I can
receive it for nothing on a simulator. I believe the training effect of flight simulators is undisputed.
From the first idea of my own cockpit in the year 1989 until today (1999) a great deal of time has passed. In
1989 one could only dream about today's possibilities within the areas of hardware and software - what will
the next 10 years bring?
